In-built Orchestrator Extensions
CloudStack provides in-built Orchestrator Extensions for Proxmox, Hyper-V and MaaS. These extensions work with Proxmox, Hyper-V and MaaS environments out of the box, and can also serve as reference implementations for anyone looking to develop new custom extensions. The Extension files are located in /usr/share/cloudstack-management/extensions/, under the subdirectories Proxmox, HyperV, and MaaS. The Proxmox Extension is written in shell script, while the Hyper-V and MaaS Extensions are written in python. Proxmox and Hyper-V Extensions support some custom actions in addition to the standard VM actions like deploy, start, stop, reboot, status and delete. After installing or upgrading CloudStack, in-built Extensions will show up in the Extensions section in UI.

Note: These Extensions may undergo changes with future CloudStack releases and backwards compatibility is not guaranteed.
Proxmox
The Proxmox CloudStack Extension is written in shell script and communicates with the Proxmox Cluster using the Proxmox VE API over HTTPS.”
Before using the Proxmox Extension, ensure that the Proxmox Datacenter is configured correctly and accessible to CloudStack.
Since 4.22.0, console access support is available for instances deployed using the in-built Proxmox extension via VNC and console proxy VM.
Note
Proxmox VNC connections have a short initial connection timeout (about 10 seconds), even when accessing the console from the CloudStack UI. If the noVNC interface takes longer to load, or if there is a delay between creating the console endpoint and opening it, the connection may fail on the first attempt. In such cases, users can simply retry to establish the console session.
Get the API Token-Secret from Proxmox
If not already set up, create a new API Token in the Proxmox UI by navigating to Datacenter > Permissions > API Tokens.
Uncheck the Privilege Separation checkbox in the Add: Token dialog
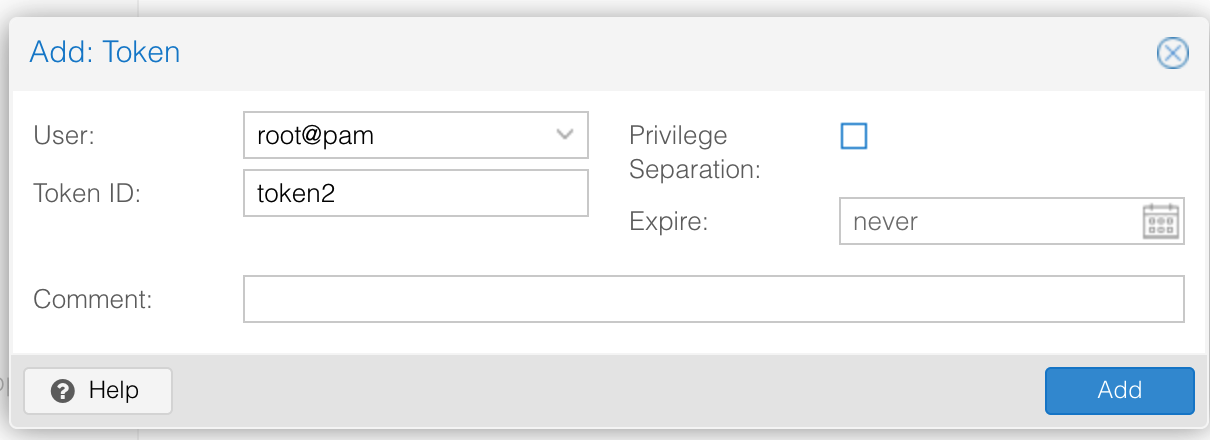
Note down the user, token, and secret.
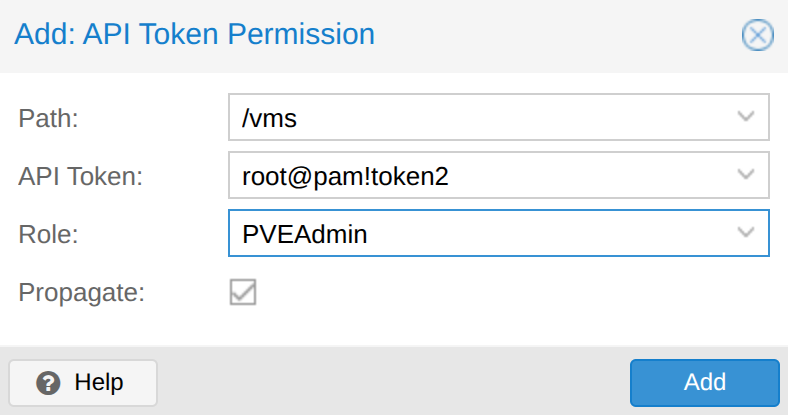
Alternatively, check the Privilege Separation checkbox in the Add: Token dialog, and give permissions to the API Token by navigating to Datacenter > Permissions > Add > API Tokens Permission
Set Role = PVEAdmin and Path = /vms
Set Role = PVEAdmin and Path = /storage
Set Role = PVEAdmin and Path = /sdn
To check whether the token and secret are working fine, you can check the following from the CloudStack Management Server:
export PVE_TOKEN='root@pam!<PROXMOX_TOKEN>=<PROXMOX_SECRET>'

curl -s -k -H "Authorization: PVEAPIToken=$PVE_TOKEN"  https://<PROXMOX_URL>:8006/api2/json/version | jq
It should return a JSON response similar to this:
{
   "data": {
      "repoid": "ec58e45e1bcdf2ac",
      "version": "8.4.0",
      "release": "8.4"
   }
}
Adding Proxmox to CloudStack
To set up the Proxmox Extension, follow these steps in CloudStack:
Enable Extension
Enable the Extension by clicking the Enable button on the Extensions page in the UI.
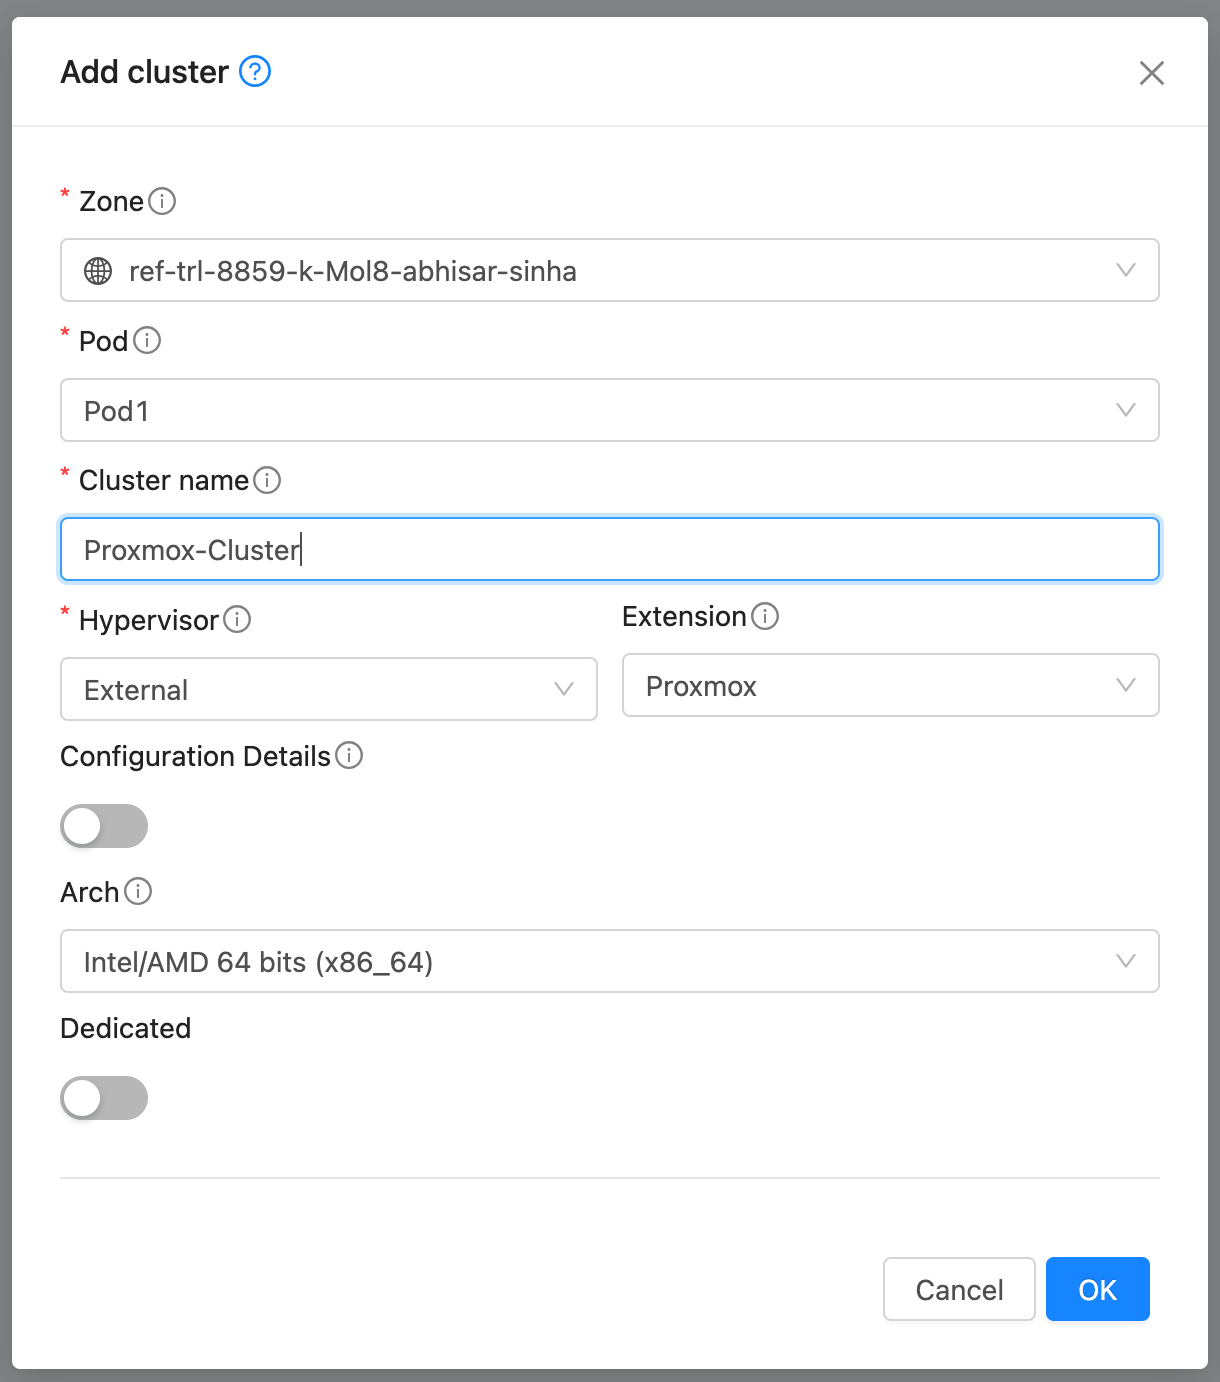
Create Cluster
Create a Cluster with Hypervisor type External and Extension type Proxmox.
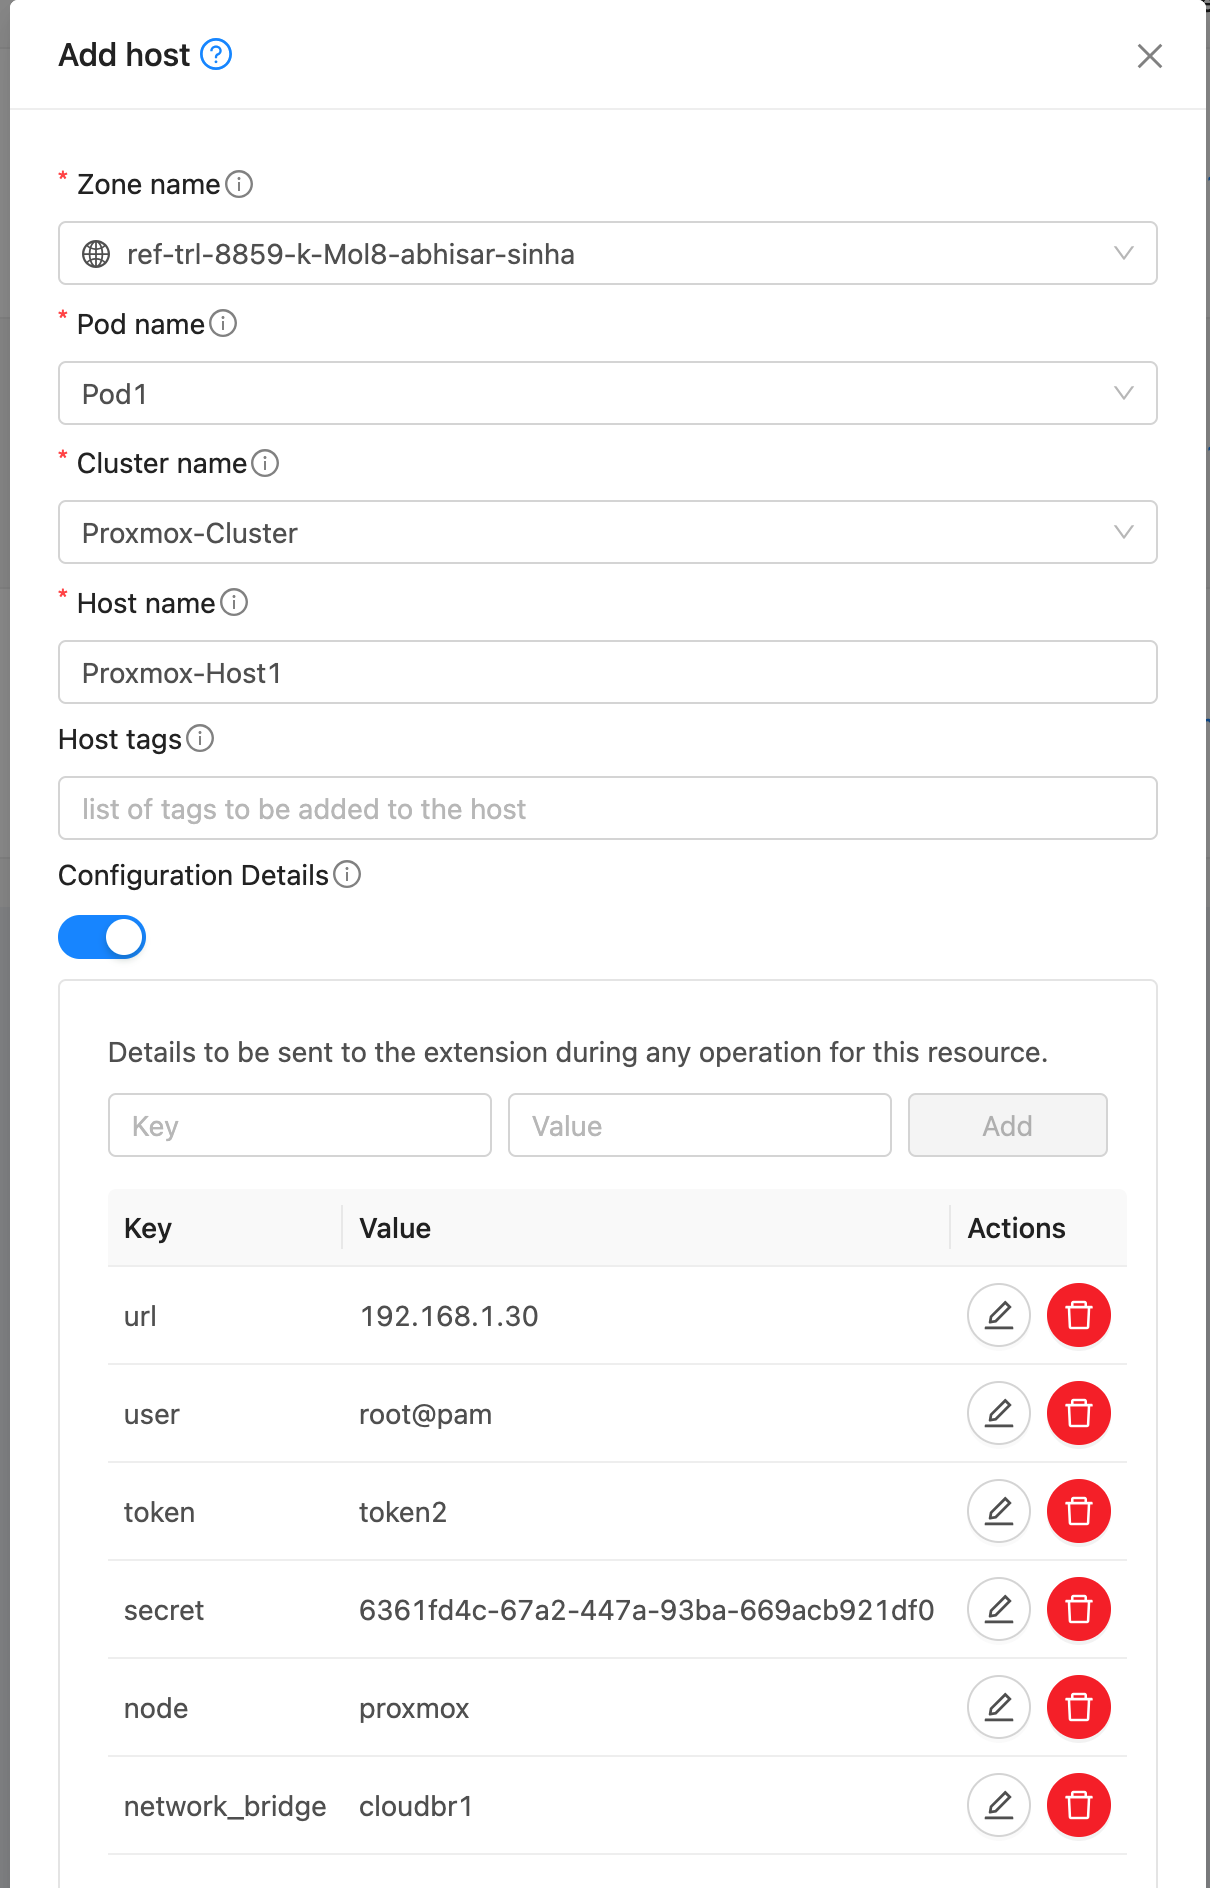
Add Host
Add a Host to the newly created Cluster with the following details:
If the Proxmox nodes use a shared API endpoint or credentials, the url, user, token, and secret can be set in the Extension’s Configuration Details instead of per Host. However, node and network_bridge must still be specified individually for each Host.
url: IP address/URL for Proxmox API access, e.g., https://<PROXMOX_URL>:8006.
user: User name for Proxmox API access
token: API token for Proxmox
secret: API secret for Proxmox
node: Hostname of the Proxmox nodes
network_bridge: Name of the network bridge to use for VM networking
Note: If the TLS certificate cannot be verified when CloudStack connects to the Proxmox node, add the detail verify_tls_certificate and set it to false to skip certificate verification.
Create Template
A Template in CloudStack can map to either a Template or an ISO in Proxmox. Provide a dummy url and template name. Select External as the hypervisor and Proxmox as the extension. Under External Details, specify:
template_type: template or iso
template_id: ID of the template in Proxmox (if template_type is template)
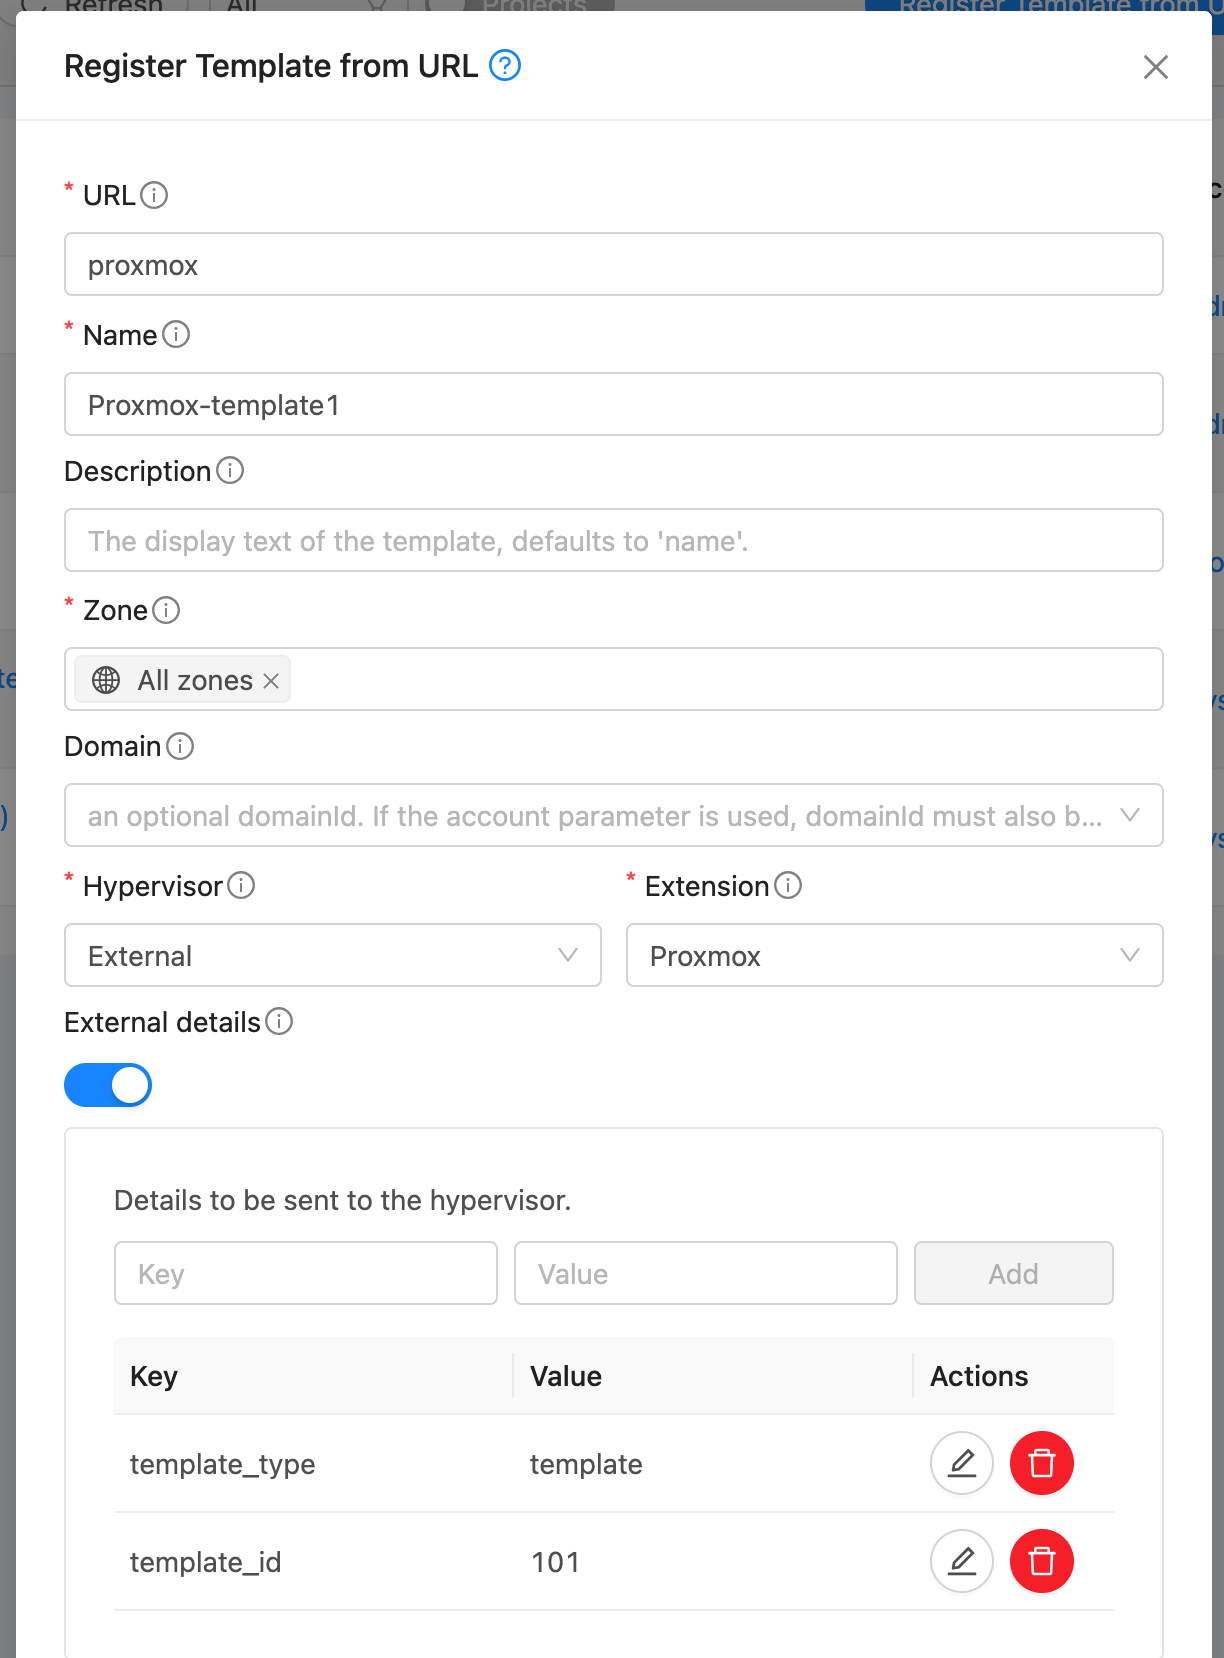
iso_path: Full path to the ISO in Proxmox (if template_type is iso)
Note: Templates and ISOs should be stored on shared storage when using multiple Proxmox nodes. Or copy the template/iso to each host’s local storage at the same location.
Deploy Instance
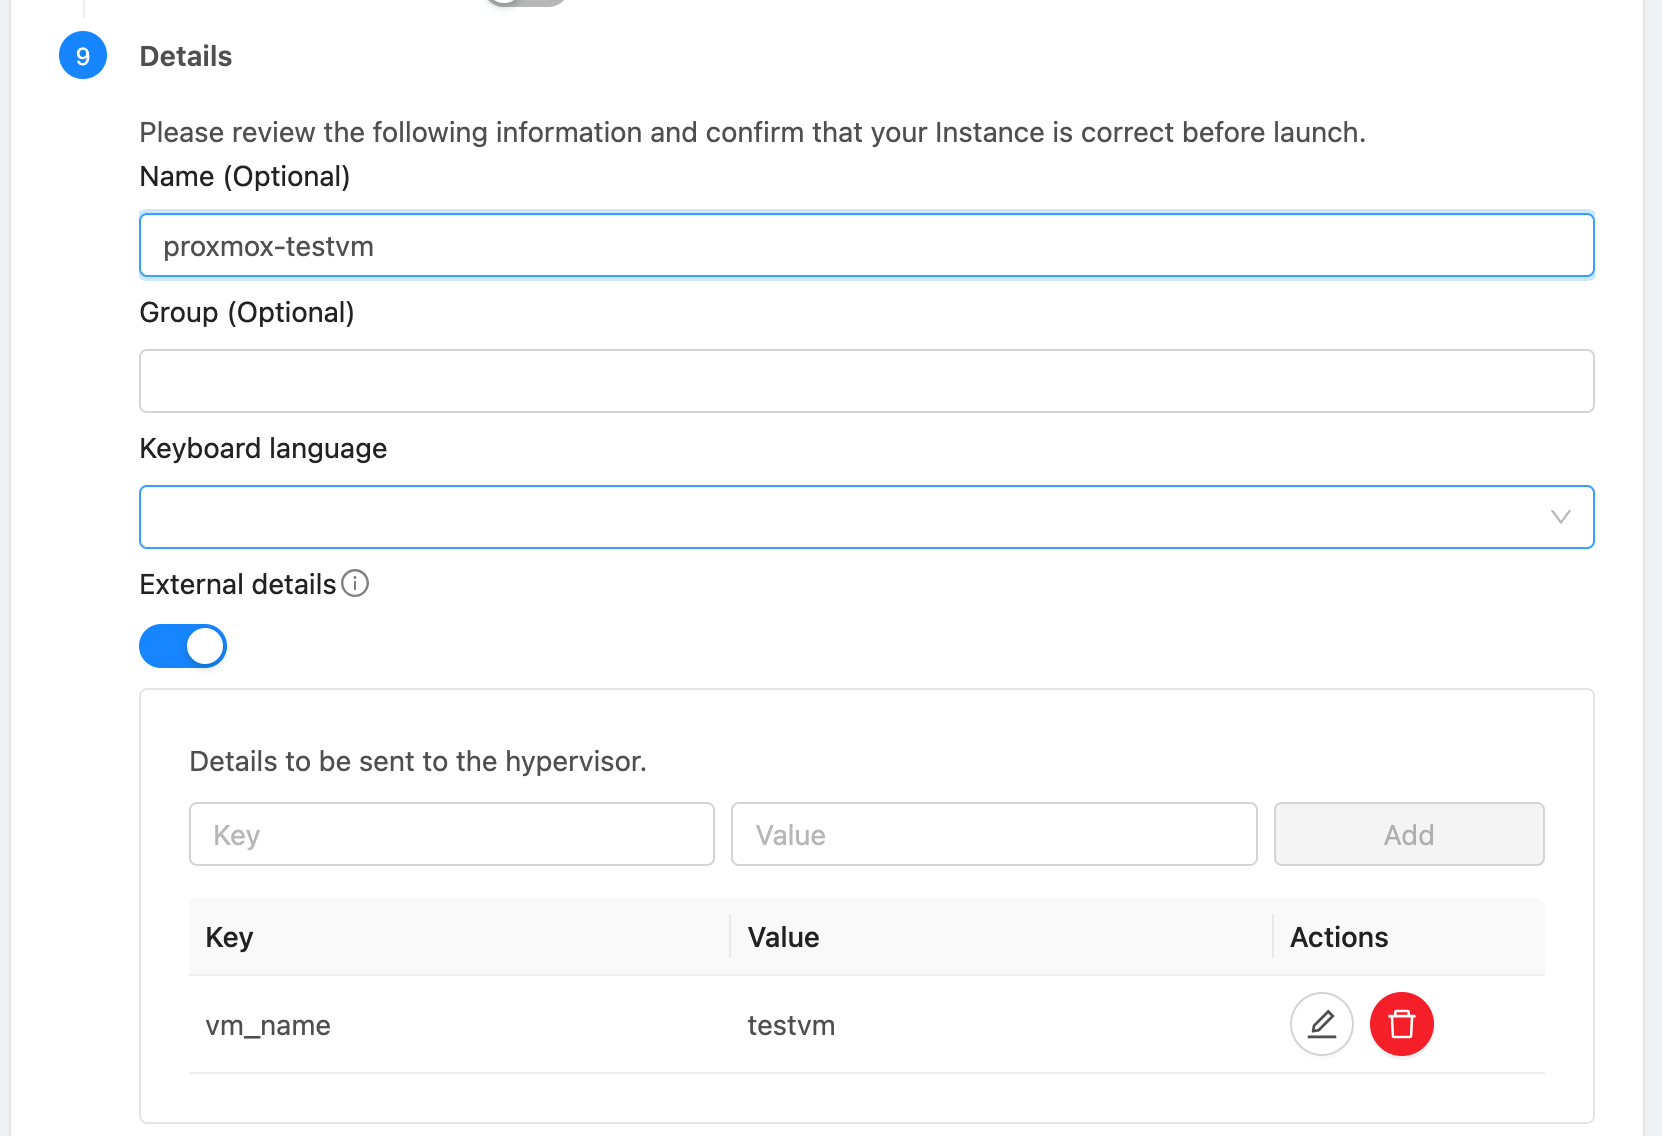
Deploy an Instance using the Template created above. Optionally, provide the detail vm_name to specify the name of the VM in Proxmox. Otherwise, the CloudStack Instance’s internal name is used. The VM Id in Proxmox is mapped to the CloudStack Instance and stored as a detail in CloudStack DB. The Instance will be provisioned on a randomly selected Proxmox host. The VM will be configured with the MAC address and VLAN ID as defined in CloudStack.
Lifecycle Operations
Operations Start, Stop, Reboot, and Delete can be performed on the Instance from CloudStack.
Custom Actions
Custom actions Create Snapshot, Restore Snapshot, and Delete Snapshot are also supported for Instances.
Configuring Networking
Proxmox nodes and CloudStack hypervisor hosts must be connected via a VLAN trunked network. On each Proxmox node, a bridge interface should be created and connected to the network interface that carries the VLAN-tagged traffic. This bridge must be specified under Configuration Details (network_bridge) when registering the Proxmox node as a Host in CloudStack.
When a VM is deployed, CloudStack includes the assigned MAC address and VLAN ID in the Extension payload. The VM created on the Proxmox node is configured with this MAC and connected to the corresponding VLAN via the specified bridge.
Upon boot, the VM broadcasts a VLAN-tagged DHCP request, which reaches the CloudStack Virtual Router (VR) handling that VLAN. The VR responds with the appropriate IP address as configured in CloudStack. Once the VM receives the lease, it becomes fully integrated into the CloudStack-managed network.
Users can then manage the Hyper-V VM like any other CloudStack guest Instance. Users can apply Egress Policies, Firewall Rules, Port Forwarding, and other networking features seamlessly through the CloudStack UI or API.
Hyper-V
The Hyper-V CloudStack Extension is a Python-based script that communicates with the Hyper-V host using WinRM (Windows Remote Management) over HTTPS, using NTLM authentication for secure remote execution of PowerShell commands that manage the full lifecycle of virtual machines.
Each Hyper-V host maps to a CloudStack Host. Before using the Hyper-V Extension, ensure that the Hyper-V host is accessible to the CloudStack Management Server via WinRM over HTTPS.
Console access for instances deployed using the Hyper-V extension is not available out of the box.
Configuring WinRM over HTTPS
Windows Remote Management (WinRM) is a protocol developed by Microsoft for securely managing Windows machines remotely using WS-Management (Web Services for Management). It allows remote execution of PowerShell commands over HTTP or HTTPS and is widely used in automation tools such as Ansible, Terraform, and Packer for managing Windows infrastructure.
To enable WinRM over HTTPS on the Hyper-V host, ensure the following:
WinRM is enabled and configured to listen on port 5986 (HTTPS).
A valid TLS certificate is installed and bound to the WinRM listener. You may use a certificate from a trusted Certificate Authority (CA) or a self-signed certificate.
The firewall on the Hyper-V host allows inbound connections on TCP port 5986.
The CloudStack Management Server has network access to the Hyper-V host on port 5986.
The Hyper-V host has a local or domain user account with appropriate permissions for managing virtual machines (e.g., creating, deleting, configuring VMs).
Sample powershell script to configure WinRM over HTTPS with self-signed TLS certificate is given below:
Enable-PSRemoting -Force
$cert = New-SelfSignedCertificate -DnsName "$env:COMPUTERNAME" -CertStoreLocation Cert:\LocalMachine\My
New-Item -Path WSMan:\LocalHost\Listener -Transport HTTPS -Address * -CertificateThumbprint $cert.Thumbprint -Force
New-NetFirewallRule -DisplayName "WinRM HTTPS" -Name "WinRM-HTTPS" -Protocol TCP -LocalPort 5986 -Direction Inbound -Action Allow
Install pywinrm on CloudStack Management Server
pywinrm is a Python library that acts as a client to remotely execute commands on Windows machines via the WinRM protocol. Install it using pip3 install pywinrm.
Host Details
Apart from the url, username and password, the following details are required when adding a Hyper-V host in CloudStack:
network_bridge: Name of the network bridge to use for VM networking. This bridge must be configured on the Hyper-V host and connected to the appropriate network interface as explained in the Configuring Networking section below.
vhd_path: Path to the storage location where VM disks will be created.
vm_path: Path to the storage location where VM configuration files and metadata will be stored.
verify_tls_certificate: Set to false to skip TLS certificate verification for self-signed certificates.
Adding Hyper-V to CloudStack
Enable Extension
Enable the Extension by clicking the Enable button on the Extensions page in the UI.
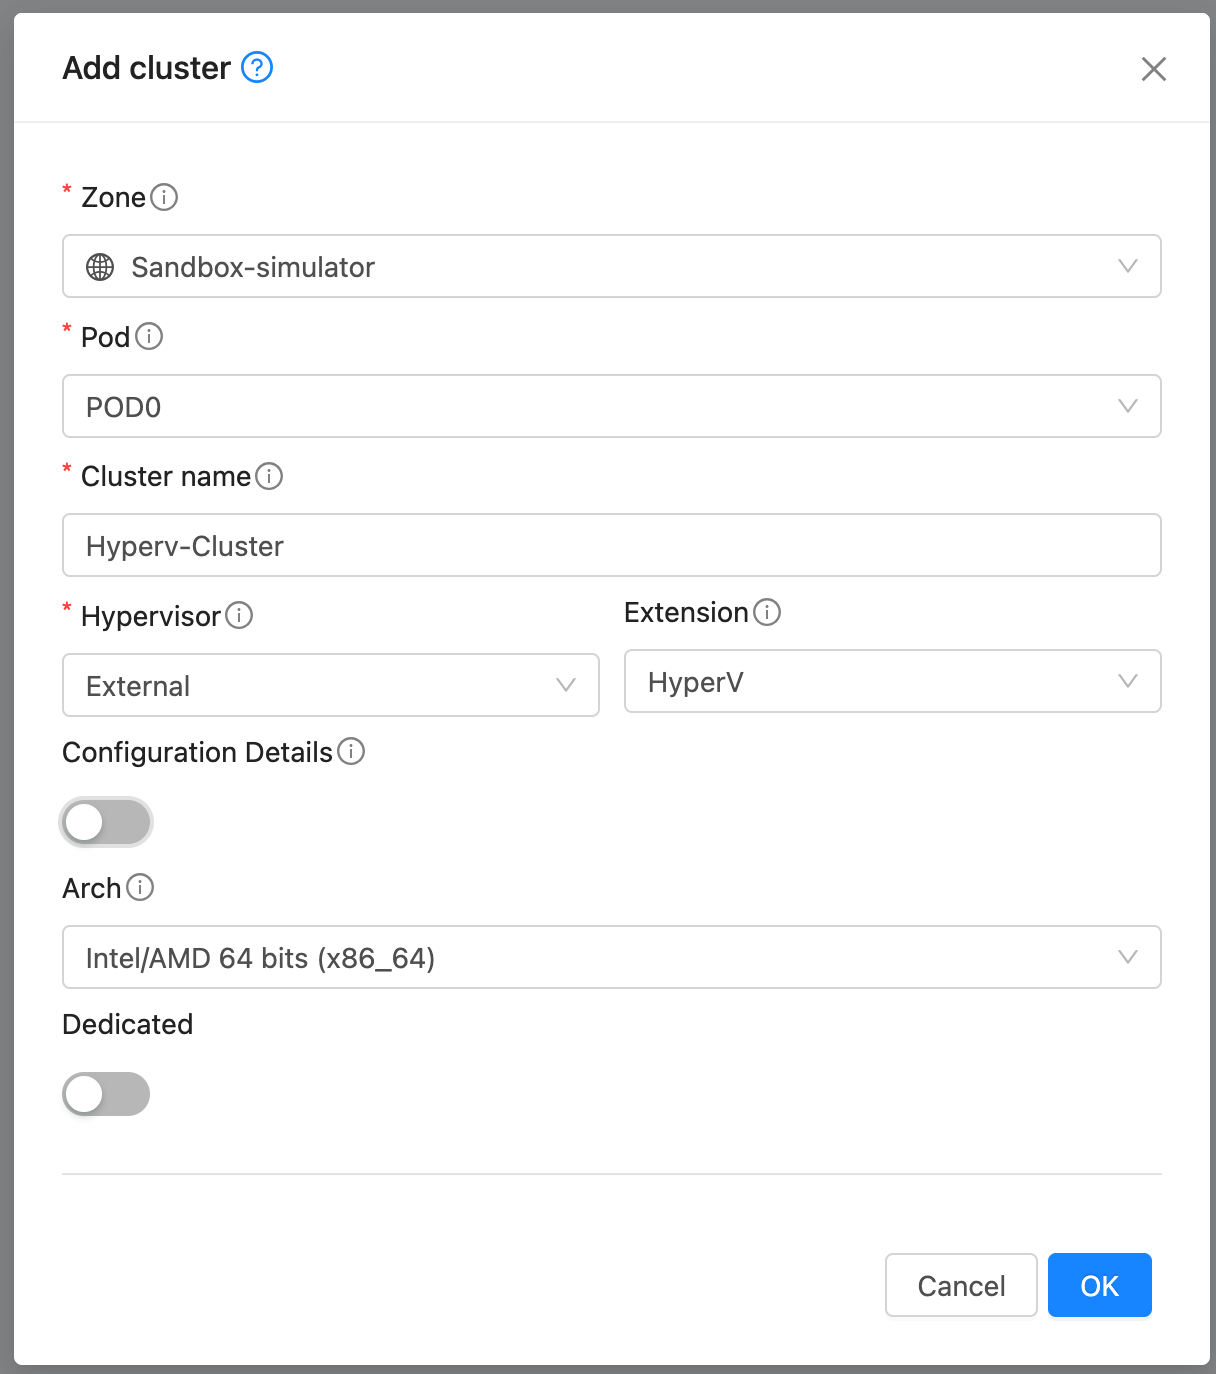
Create Cluster
Create a Cluster with Hypervisor type External and Extension type HyperV.
Add Host
Add a Host to the newly created Cluster with the following details:
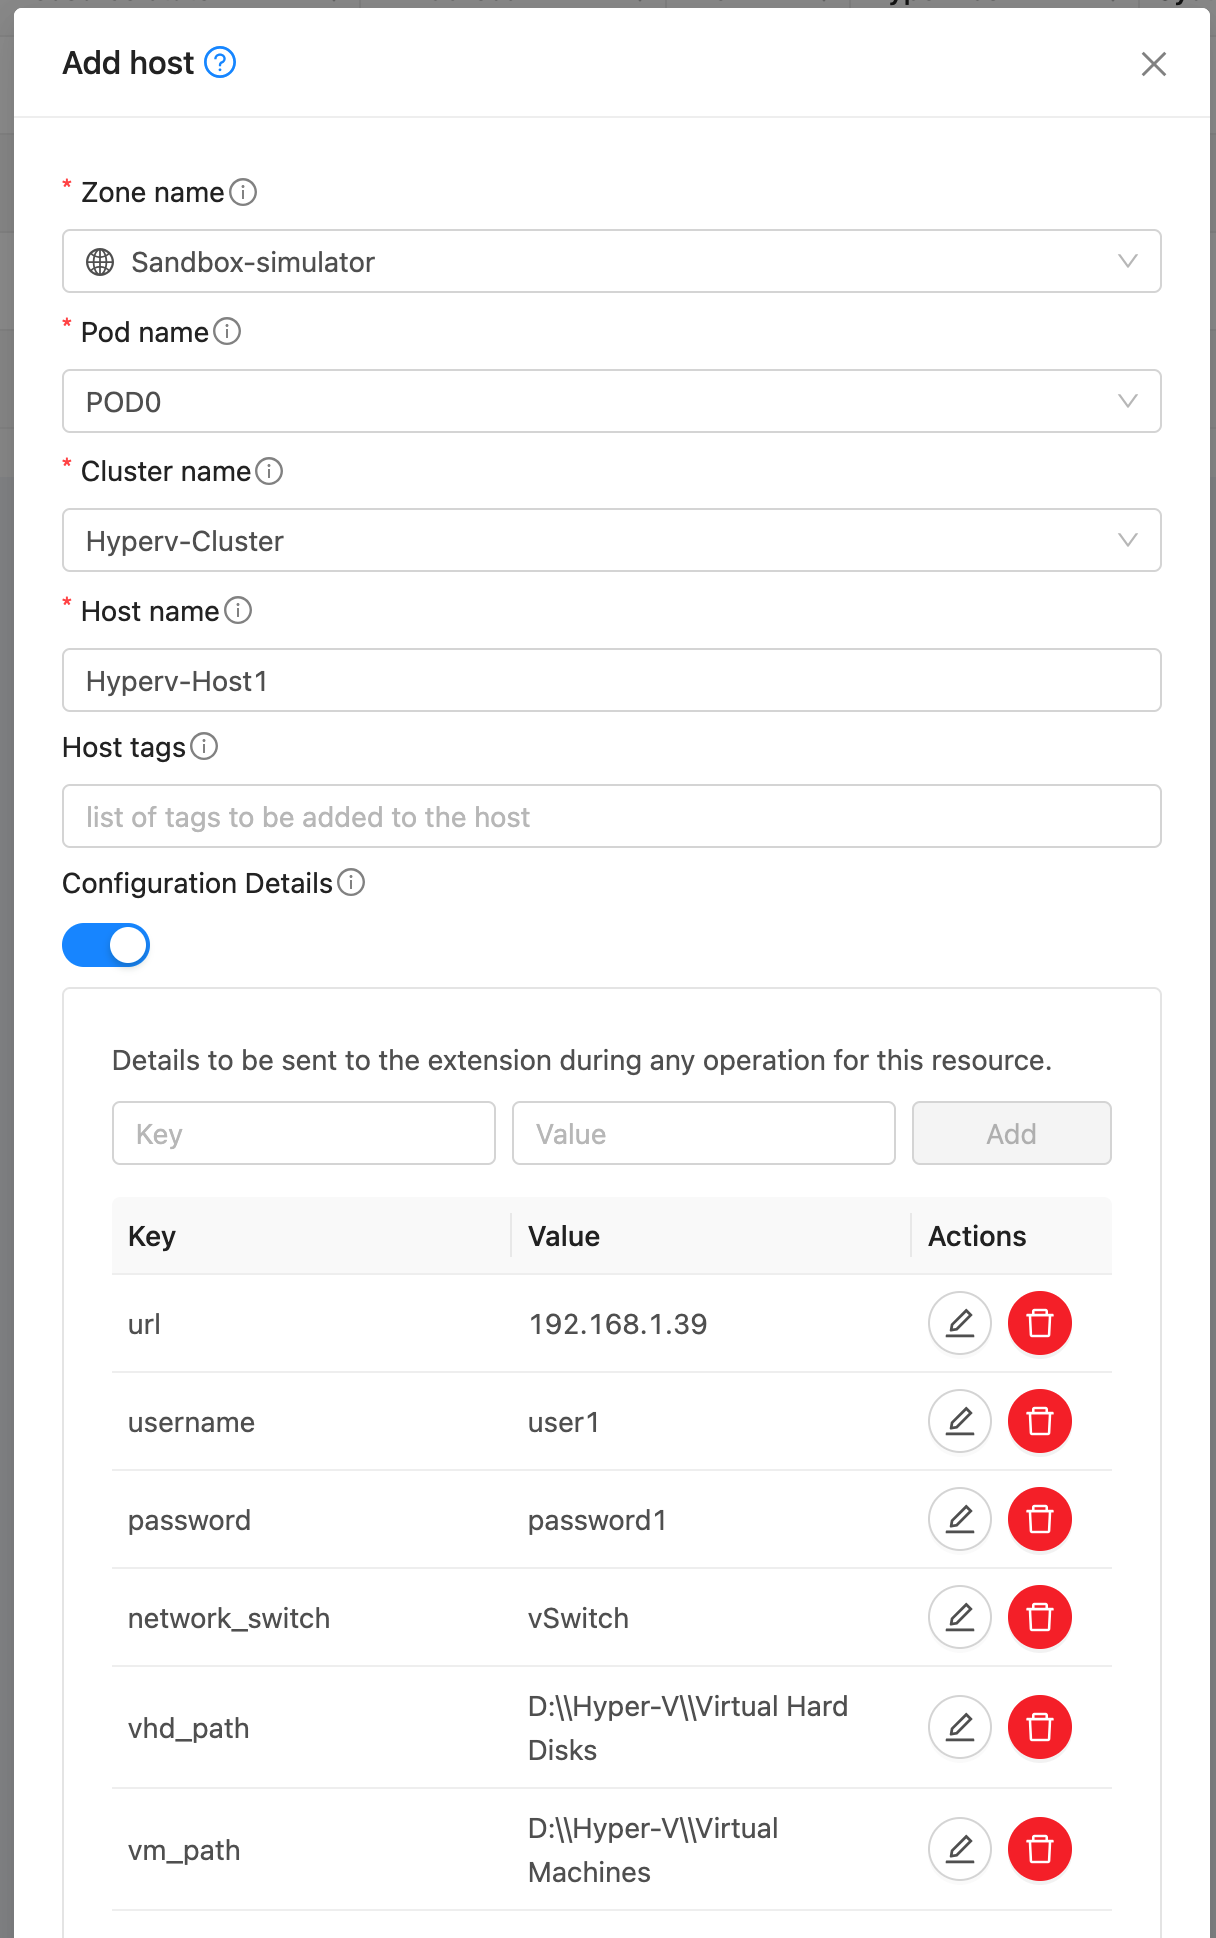
Note: Add the detail verify_tls_certificate set to false to skip TLS certificate verification for self-signed certificates.
Create Template
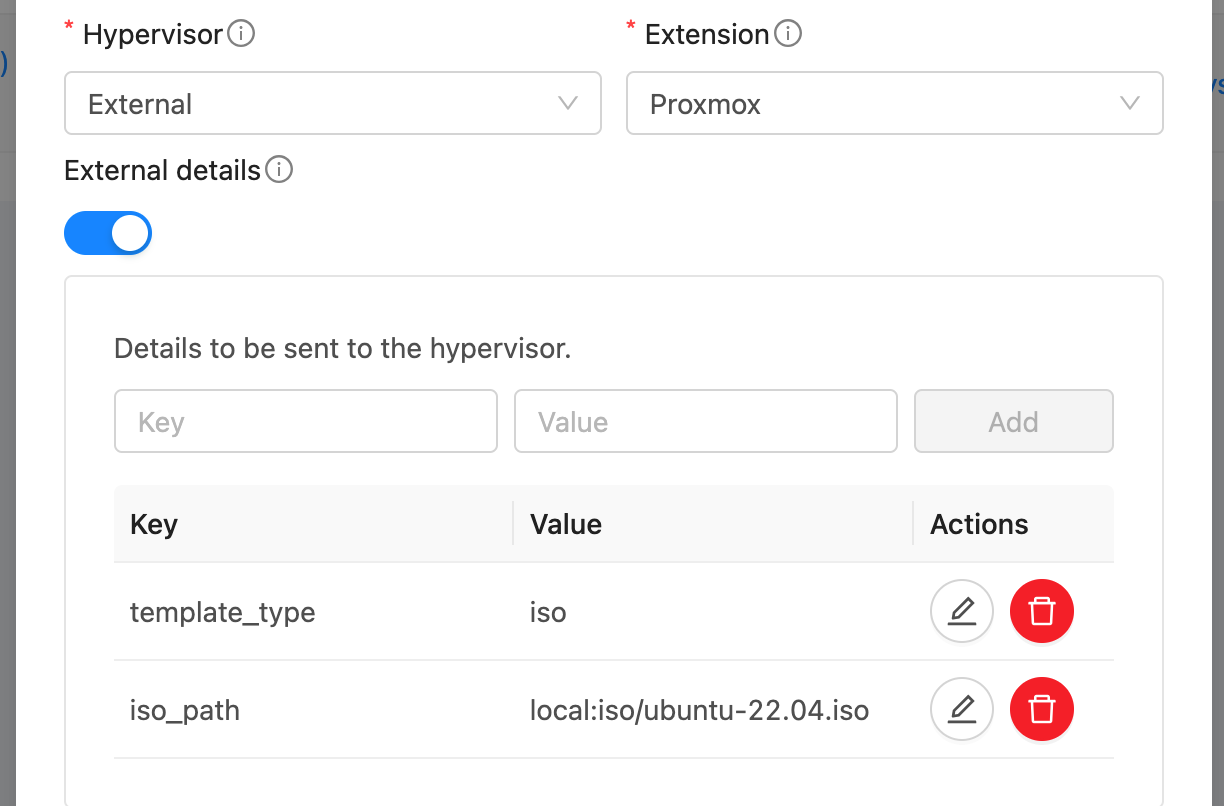
A Template in CloudStack can map to either a Template or an ISO in Hyper-V. Provide a dummy url and Template name. Select External as the hypervisor and HyperV as the Extension. Under External Details, specify:
template_type: template or iso
generation: VM generation (1 or 2)
template_path: Full path to the template .vhdx file (if template_type is template)
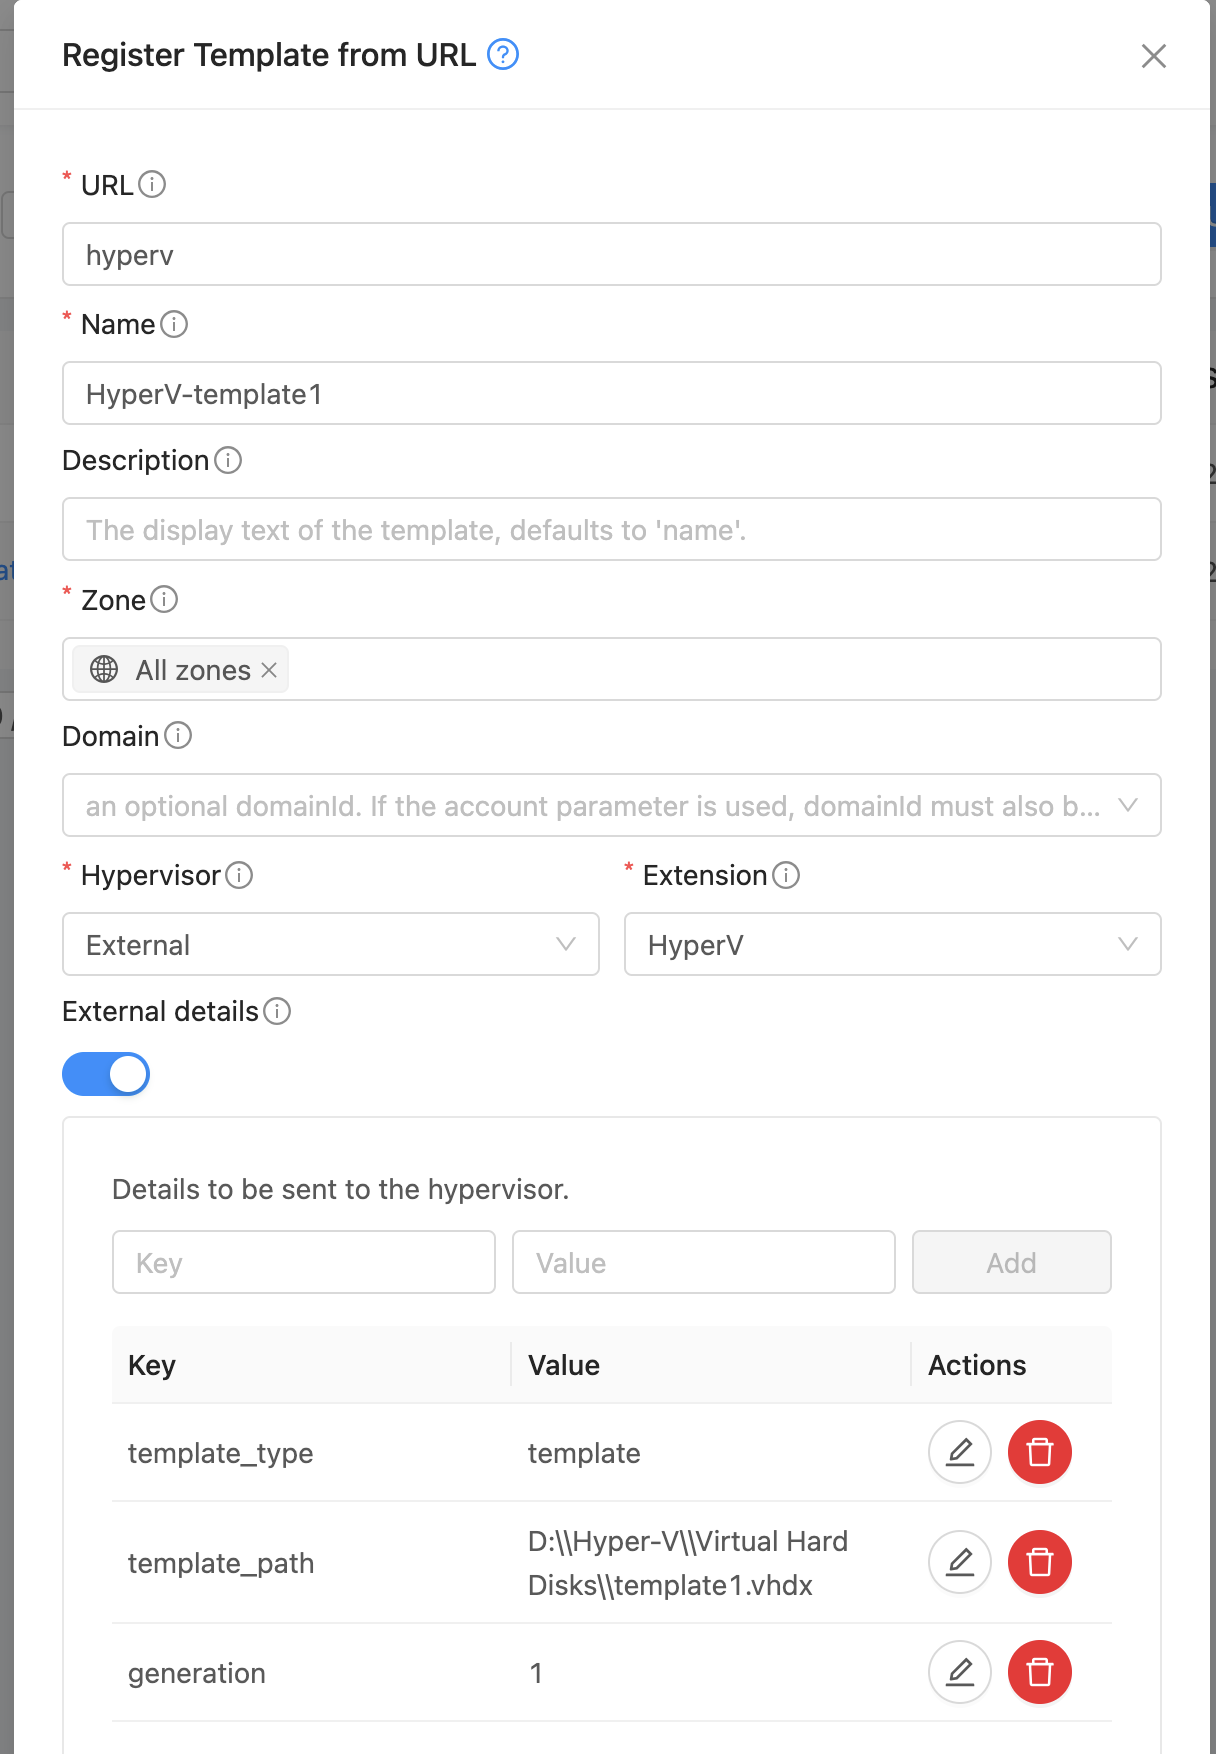
iso_path: Full path to the ISO in HyperV (if template_type is iso)
vhd_size_gb: Size of the VHD disk to create (in GB) (if template_type is iso)
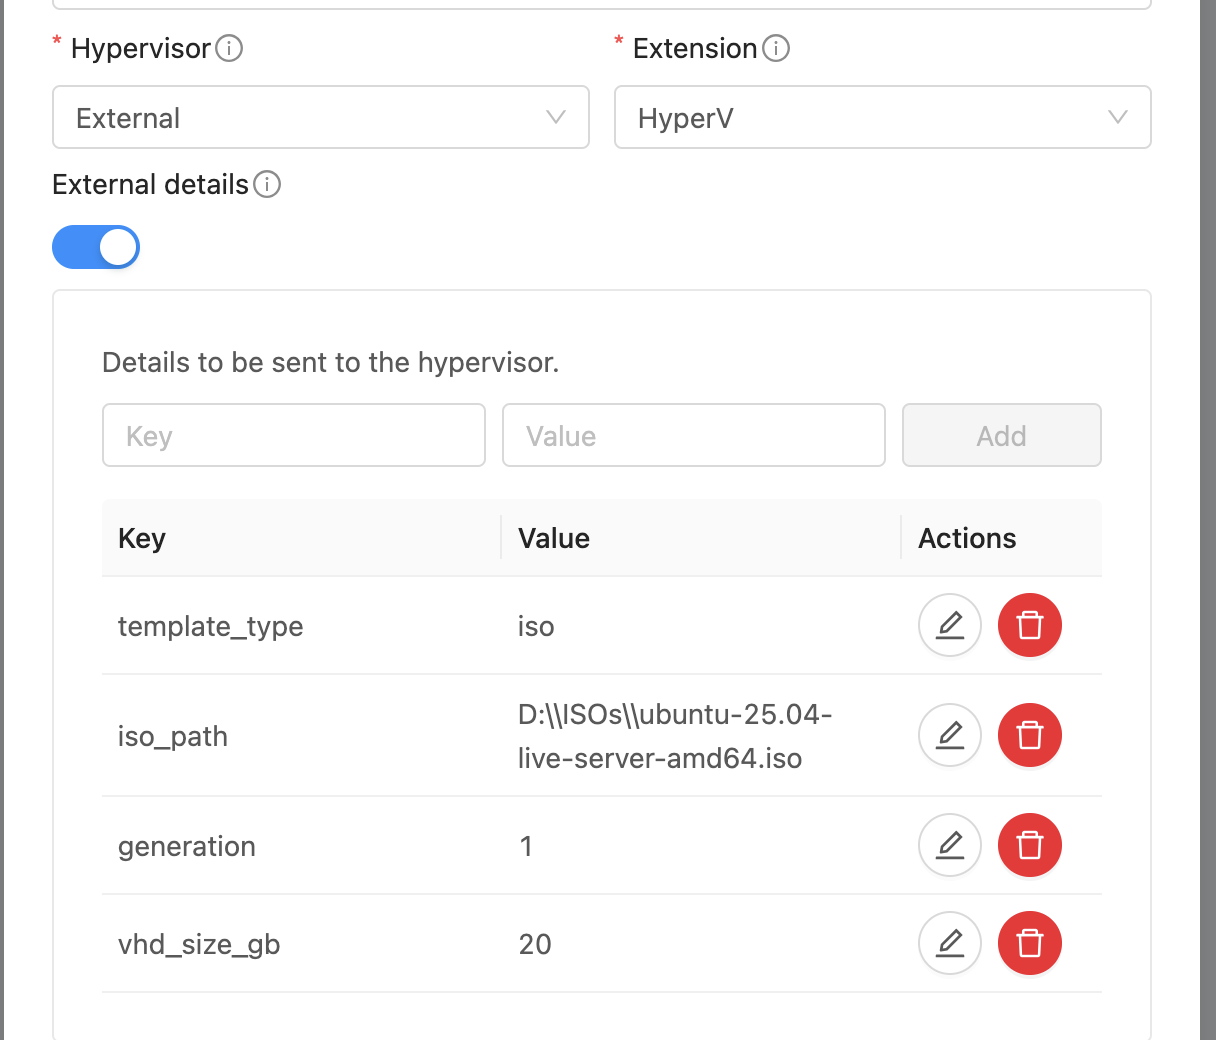
Note: Templates and ISOs should be stored on shared storage when using multiple HyperV nodes. Or copy the template/iso to each host’s local storage at the same location.
Deploy Instance
Deploy an Instance using the template created above. The Instance will be provisioned on a randomly selected Hyper-V host. The VM will be configured with the MAC address and VLAN ID as defined in CloudStack. The VM in Hyper-V is created with the name ‘CloudStack Instance’s internal name’ + ‘-’ + ‘CloudStack Instance’s UUID’ to keep it unique.
Lifecycle Operations
Operations Start, Stop, Reboot, and Delete can be performed on the Instance from CloudStack.
Custom Actions
Custom actions Suspend, Resume, Create Snapshot, Restore Snapshot, and Delete Snapshot are also supported for Instances.
Configuring Networking
Hyper-V hosts and CloudStack hypervisor Hosts must be connected via a VLAN trunked network. On each Hyper-V host, an external virtual switch should be created and bound to the physical network interface that carries VLAN-tagged traffic. This switch must be specified in the Configuration Details (network_bridge) when adding the Hyper-V host to CloudStack.
When a VM is deployed, CloudStack includes the assigned MAC address and VLAN ID in the Extension payload. The VM is then created on the Hyper-V host with this MAC address and attached to the specified external switch with the corresponding VLAN configured.
Upon boot, the VM sends a VLAN-tagged DHCP request, which reaches the CloudStack Virtual Router (VR) responsible for that VLAN. The VR responds with the correct IP address as configured in CloudStack. Once the VM receives the lease, it becomes fully integrated into the CloudStack-managed network.
Users can then manage the Hyper-V VM like any other CloudStack guest Instance. Users can apply Egress Policies, Firewall Rules, Port Forwarding, and other networking features seamlessly through the CloudStack UI or API.
MaaS
The MaaS Extension for CloudStack is written in Python and communicates with Canonical MaaS using the MaaS APIs.
Before using the MaaS Extension, ensure that the Canonical MaaS Service is configured correctly with servers added into it and accessible to CloudStack.
Get the API key from MaaS
If not already set up, create a new API Key in the MaaS UI by navigating to left column under admin > API keys.
Existing MAAS consumer token can be used or a new API key can be generated by clicking the Generate MAAS API Key button

Note down the key value.
You can verify the MAAS API key and connectivity from the CloudStack Management Server by using the MAAS CLI as shown below (replace the example values with your own):
maas login admin http://<MAAS-ENDPOINT>:5240/MAAS <API_KEY>

# Example:
maas login admin http://10.0.80.47:5240/MAAS QqeFTc4fvz9qQyPzGy:UUGKTDf6VwPVDnhXUp:wtAZk6rKeHrFLyDQD9sWcASPkZVSMu6a

# Verify MAAS connectivity and list machines
maas admin machines read | jq '.[].system_id'
If the connection is successful, the command will list all registered machine system IDs from MAAS.
Install required Python libraries
The MAAS Orchestrator Extension uses OAuth1 for API authentication.
Ensure the required Python libraries are installed on the CloudStack Management Server before using this extension. The following command is provided as an example, package installation steps may vary depending on the host operating system:
pip3 install requests requests_oauthlib
Adding MaaS to CloudStack
To set up the MaaS Extension, follow these steps in CloudStack:
Use Default Extension
A default MaaS Extension is already available and enabled under Extensions tab.
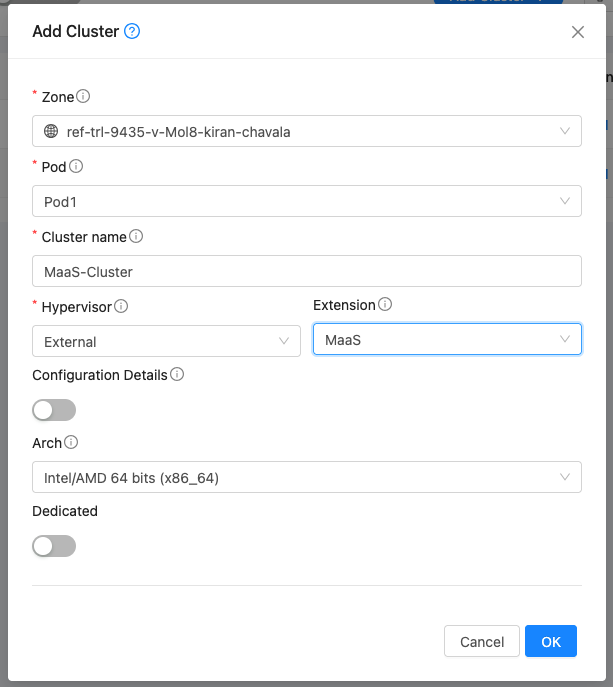
Create Cluster
Create a Cluster with Hypervisor type External and Extension type MaaS.
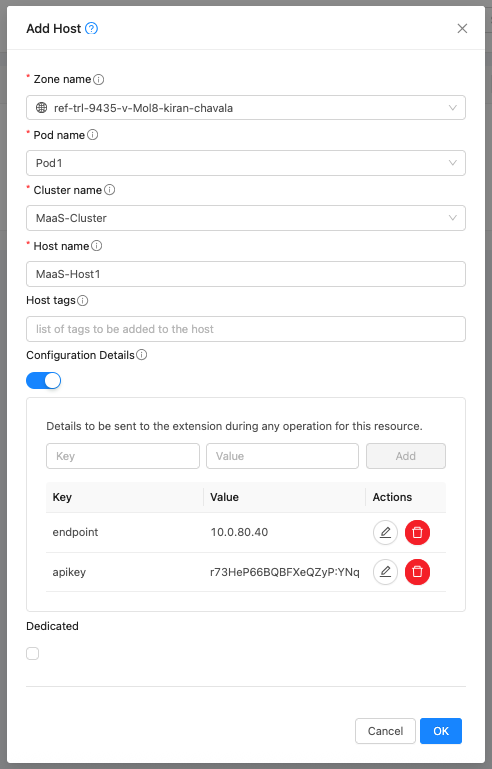
Add Host
Add a Host to the newly created Cluster with the following details:
To access MaaS environment, the endpoint, apikey need to be set in the Host.
endpoint: IP address of the MaaS server. The API used for operations in the script will look like http://<endpoint>:5240/MAAS/api/2.0.
apikey: API key for MaaS
Create Template
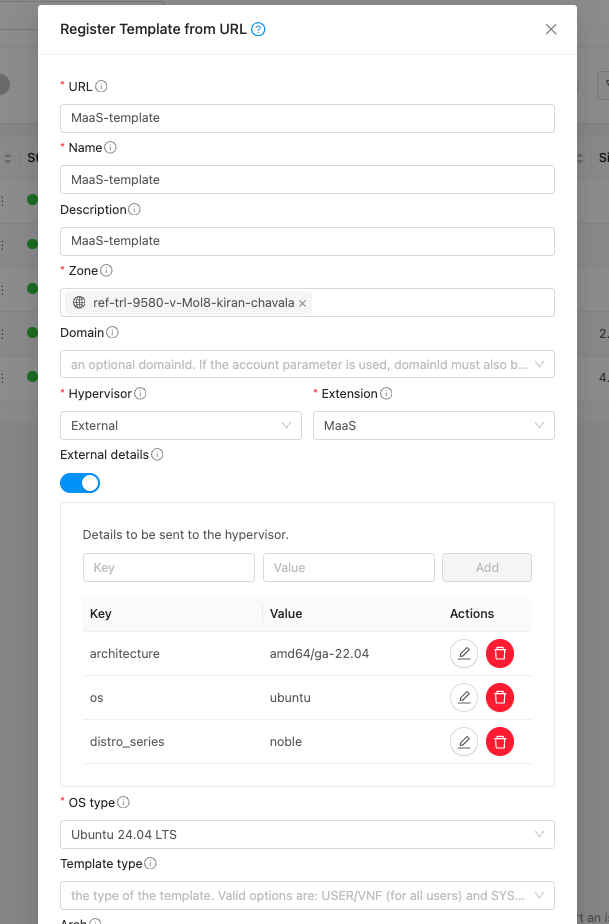
A Template in CloudStack maps to an image available in MaaS that can be deployed on a baremetal server. Provide a dummy url and template name. Select External as the hypervisor and MaaS as the extension. Under External Details, specify the following parameters:
os: Operating system name (e.g., ubuntu)
distro_series: Ubuntu codename (e.g., focal, jammy)
architecture: Image architecture name as listed in MaaS (e.g., amd64/ga-20.04, amd64/hwe-22.04, amd64/generic)
MAAS uses only distro_series to identify the operating system for Ubuntu-based images (for example, focal, jammy).
Example configurations:
# Ubuntu 20.04 (Focal)
os=ubuntu
distro_series=focal
architecture=amd64/ga-20.04
Deploy Instance
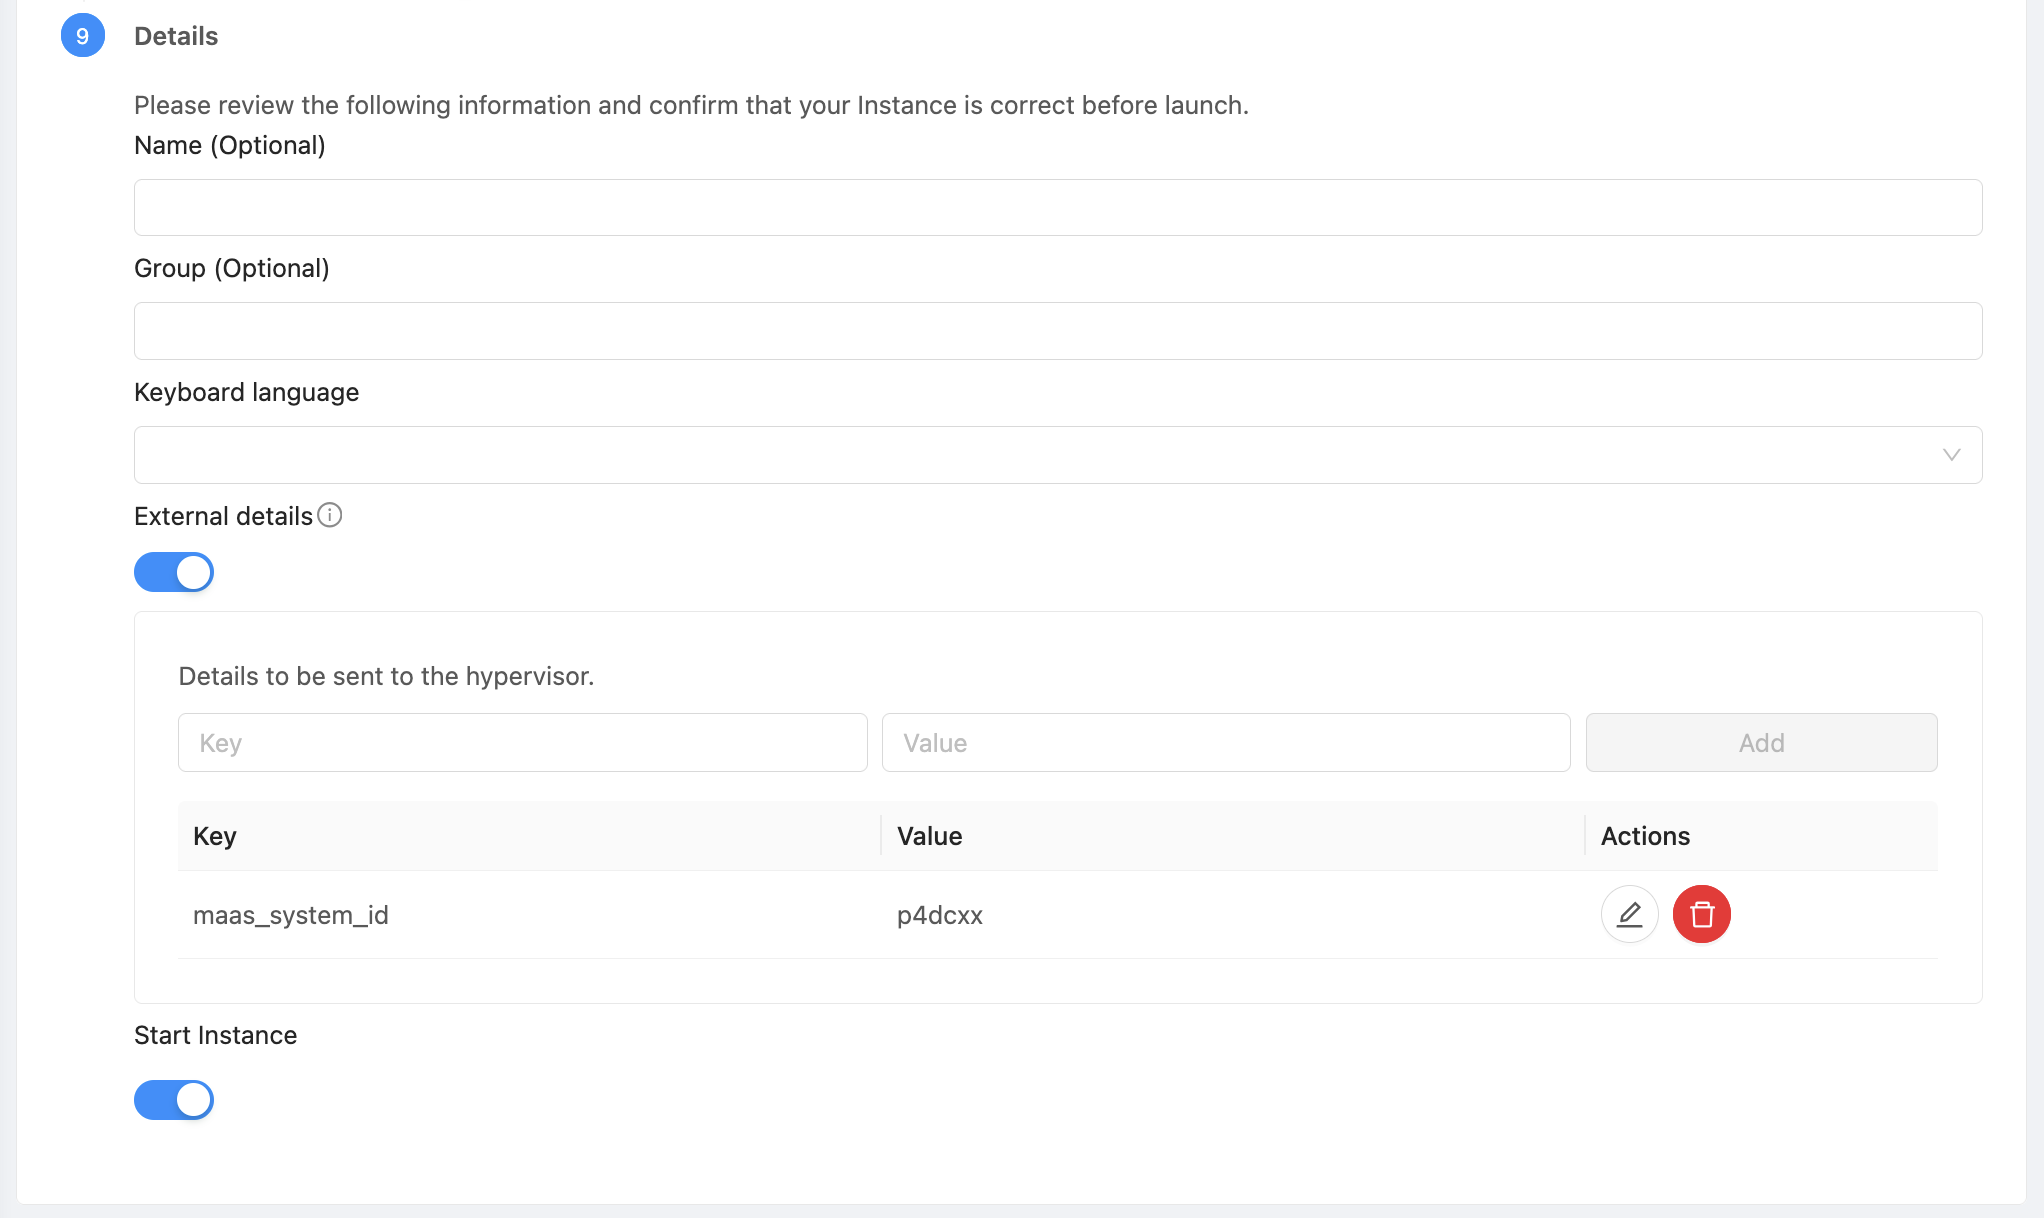
Deploy an Instance using the Template created above. The Instance will be provisioned on a randomly selected MaaS machine. maas_system_id value can be provided in the external details to deploy the instance on specific server.
Lifecycle Operations
Operations Start, Stop, Reboot, and Delete can be performed on the Instance from CloudStack.
Configuring Networking and additional details
The MaaS scenarios have been tested and verified only with a Shared Network setup in CloudStack and with ubuntu based images, using the MAAS Orchestrator Extension. Please find some additional notes with respect to the networking and access related configuration as below,
Configuring TFTP to point to MAAS
Ensure that the TFTP or PXE boot configuration (for example, in pfSense or your network’s DHCP server) is set to point to the MAAS server as the TFTP source. This ensures that VMs retrieve boot images directly from MAAS during PXE boot.
Using CloudStack Virtual Router (VR) as an External DHCP Server
If the end user wants the CloudStack Virtual Router (VR) to act as the external DHCP server for instances provisioned through MAAS, the following configuration steps must be performed.
In CloudStack
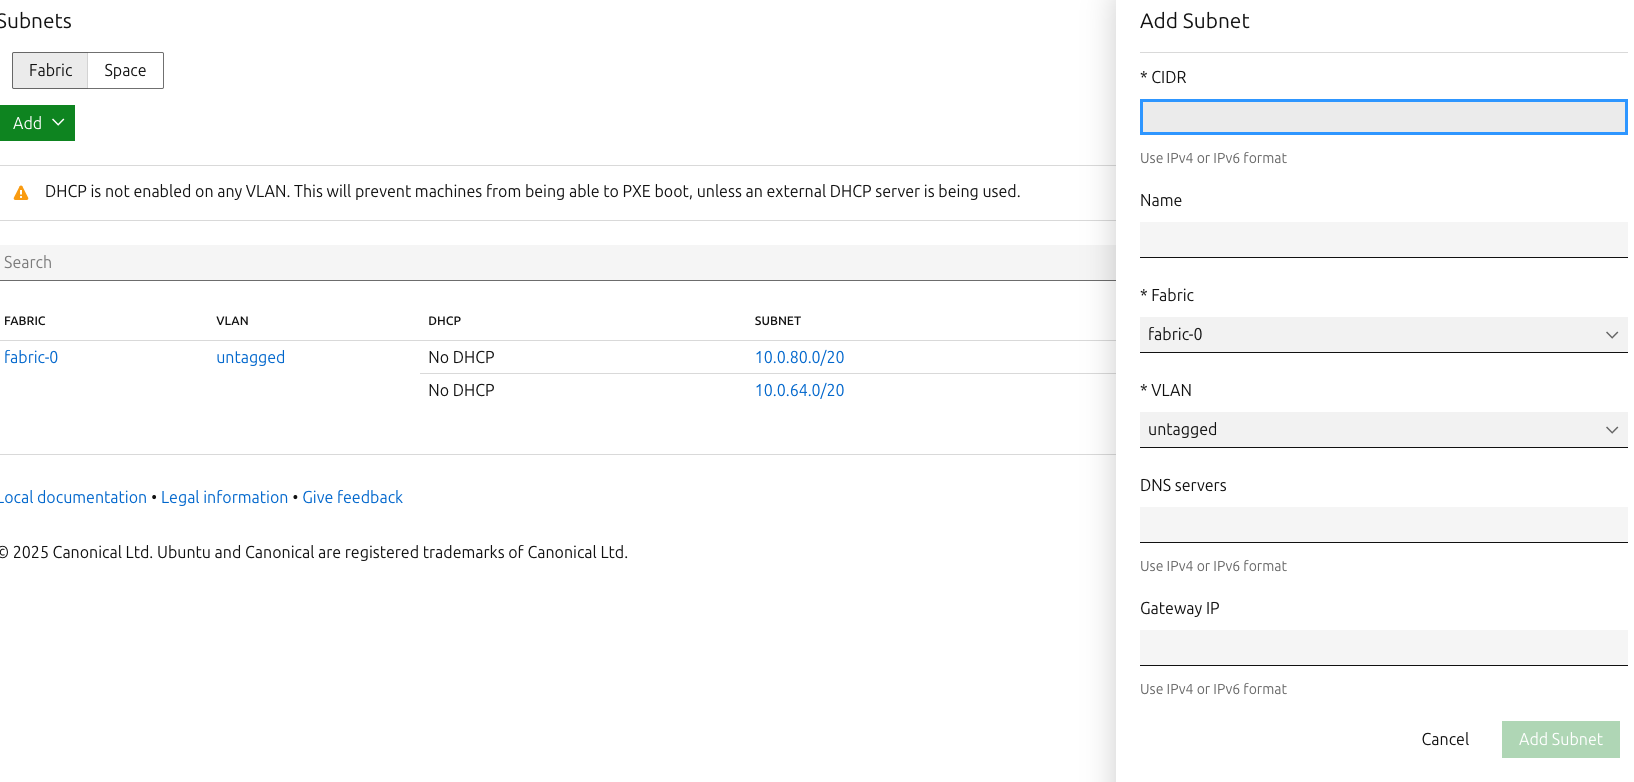
Navigate to Networks → Add Shared Network.
Create a Shared Network using the DefaultSharedNetworkOffering, and define an appropriate Guest IP range.

In MAAS
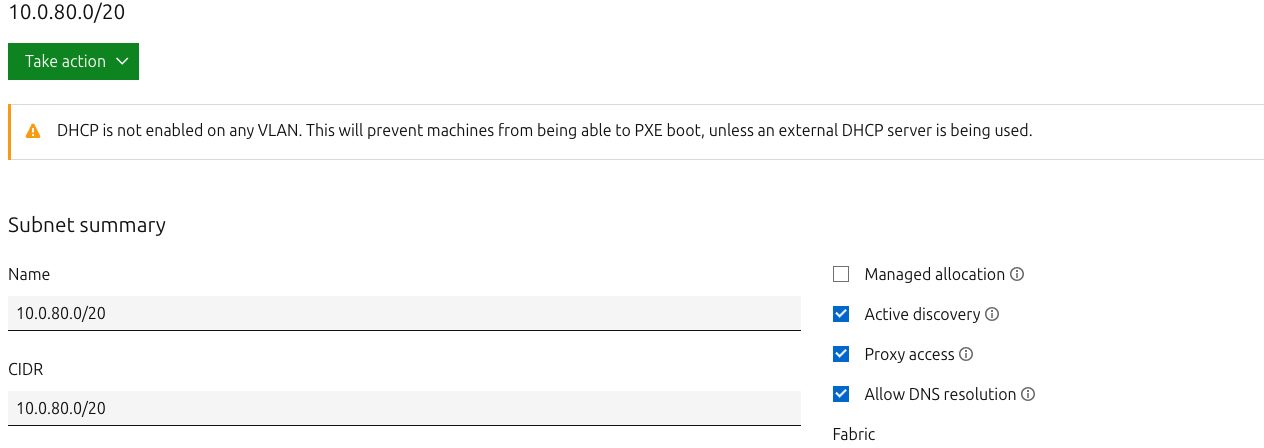
Navigate to Networking → Subnets → Add Subnet and create a subnet corresponding to the same IP range used in CloudStack.
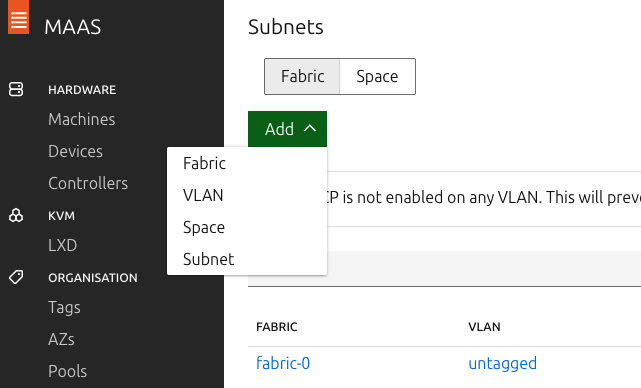
Once the subnet is added: - Ensure Managed allocation is disabled. - Ensure Active discovery is enabled.
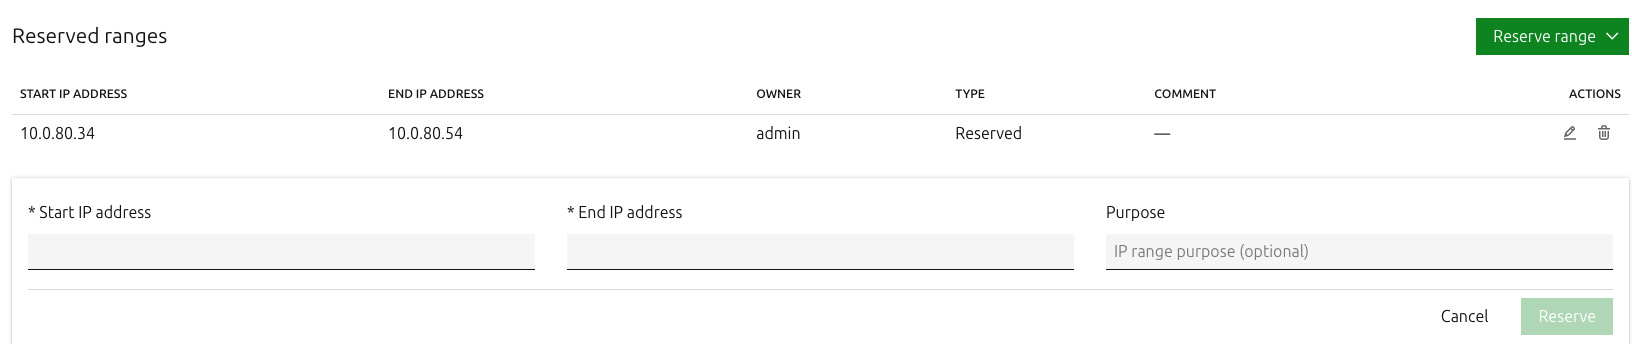
Add a Reserved IP range that matches the CloudStack Guest range (optional, for clarity).
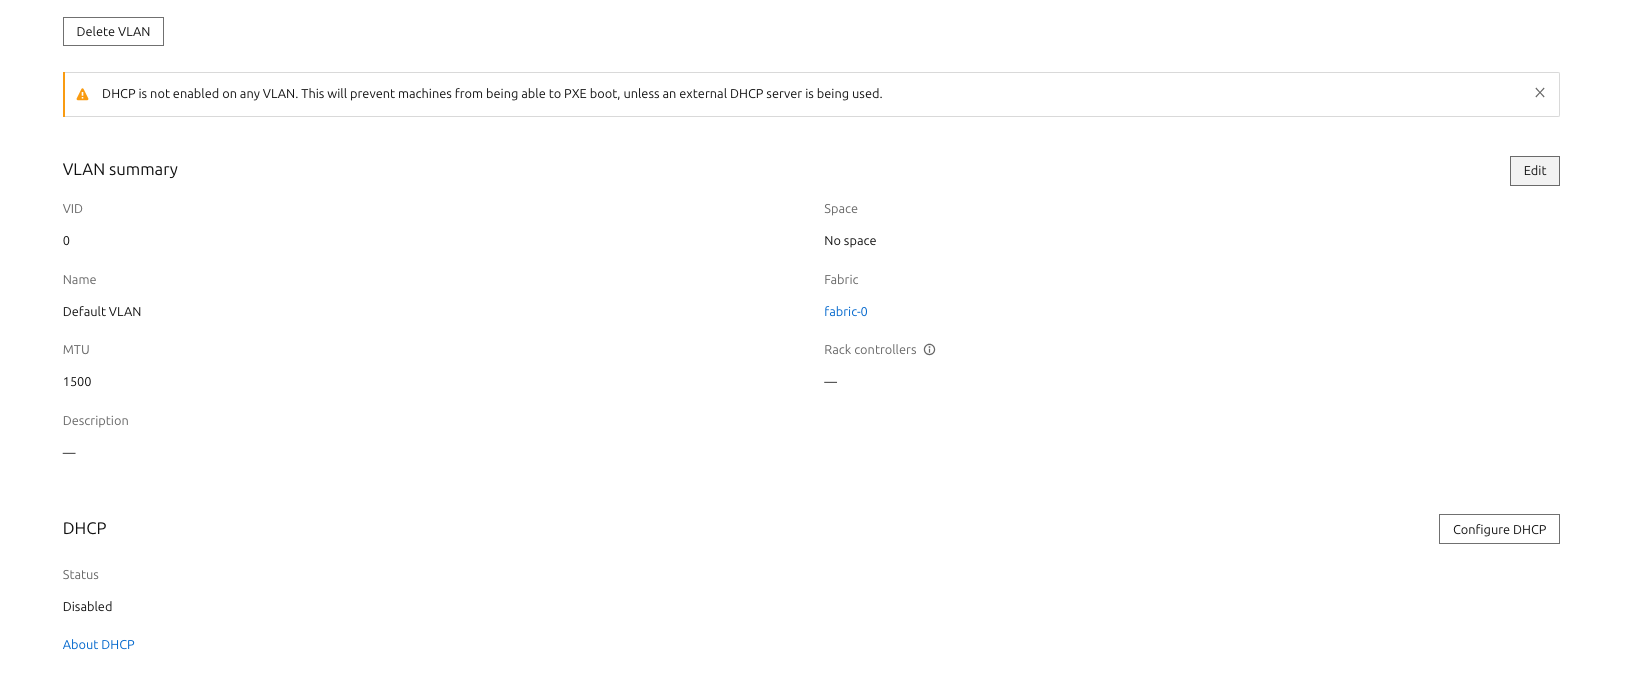
Disable the DHCP service in MAAS: - Navigate to Subnets → VLAN → Edit VLAN. - Ensure the DHCP service is disabled.
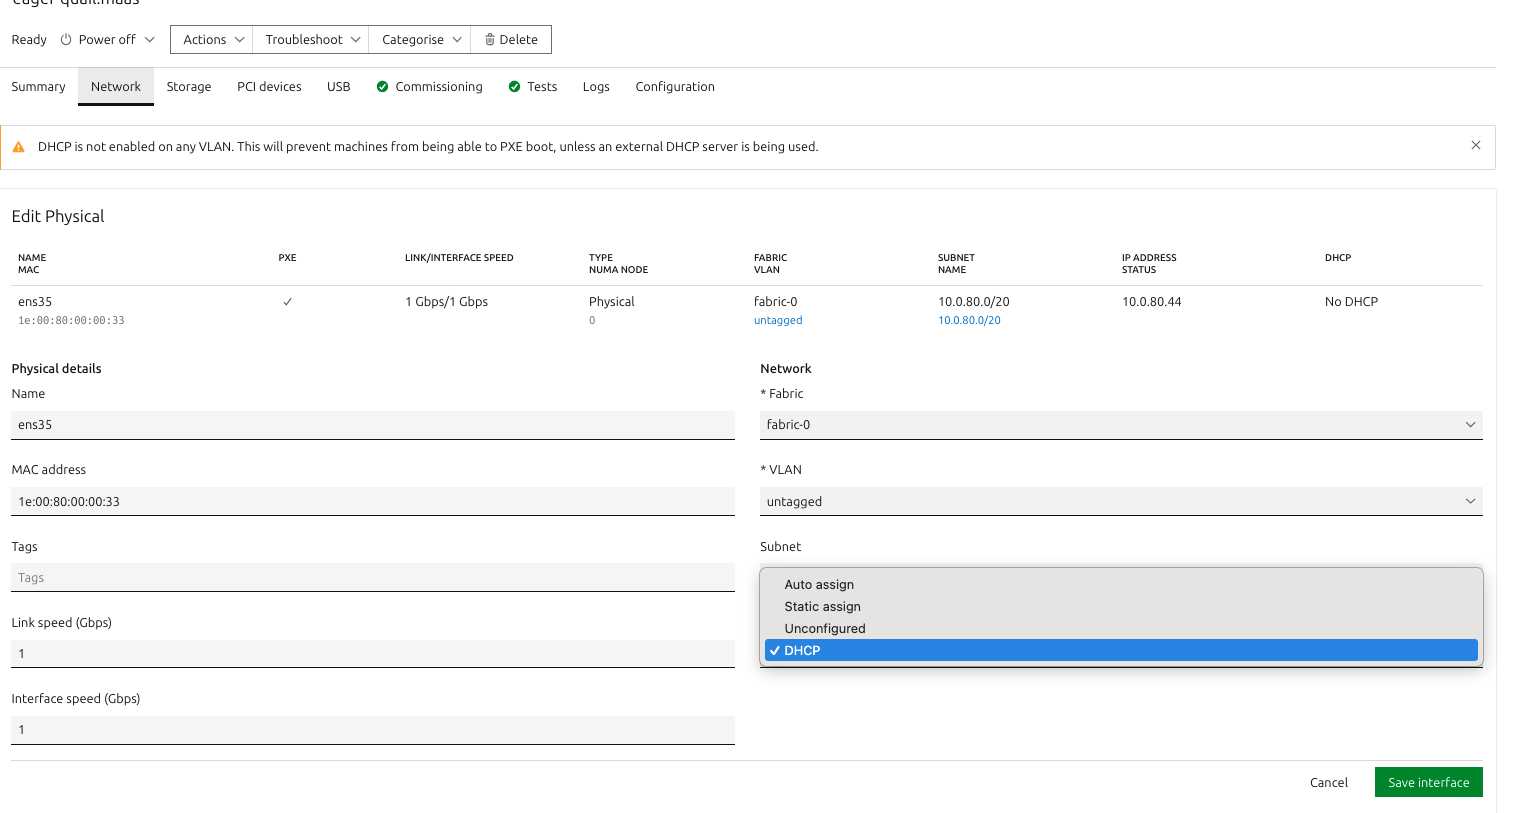
For all the servers in MAAS, navigate to each server in the Ready state, go to Network → Server Interface → Edit Physical, and set the IP mode to DHCP.
This configuration allows the CloudStack Virtual Router (VR) to provide IP address allocation and DHCP services for the baremetal instances managed through MAAS.
Using CloudStack-Generated SSH Keys for Baremetal Access
If the user wants to use the SSH key pair generated in CloudStack to log into the baremetal server provisioned by MAAS, perform the following steps.
In CloudStack
Navigate to Compute → SSH Keypairs → Create SSH Keypair.
Save the generated private key for later use (CloudStack stores only the public key).
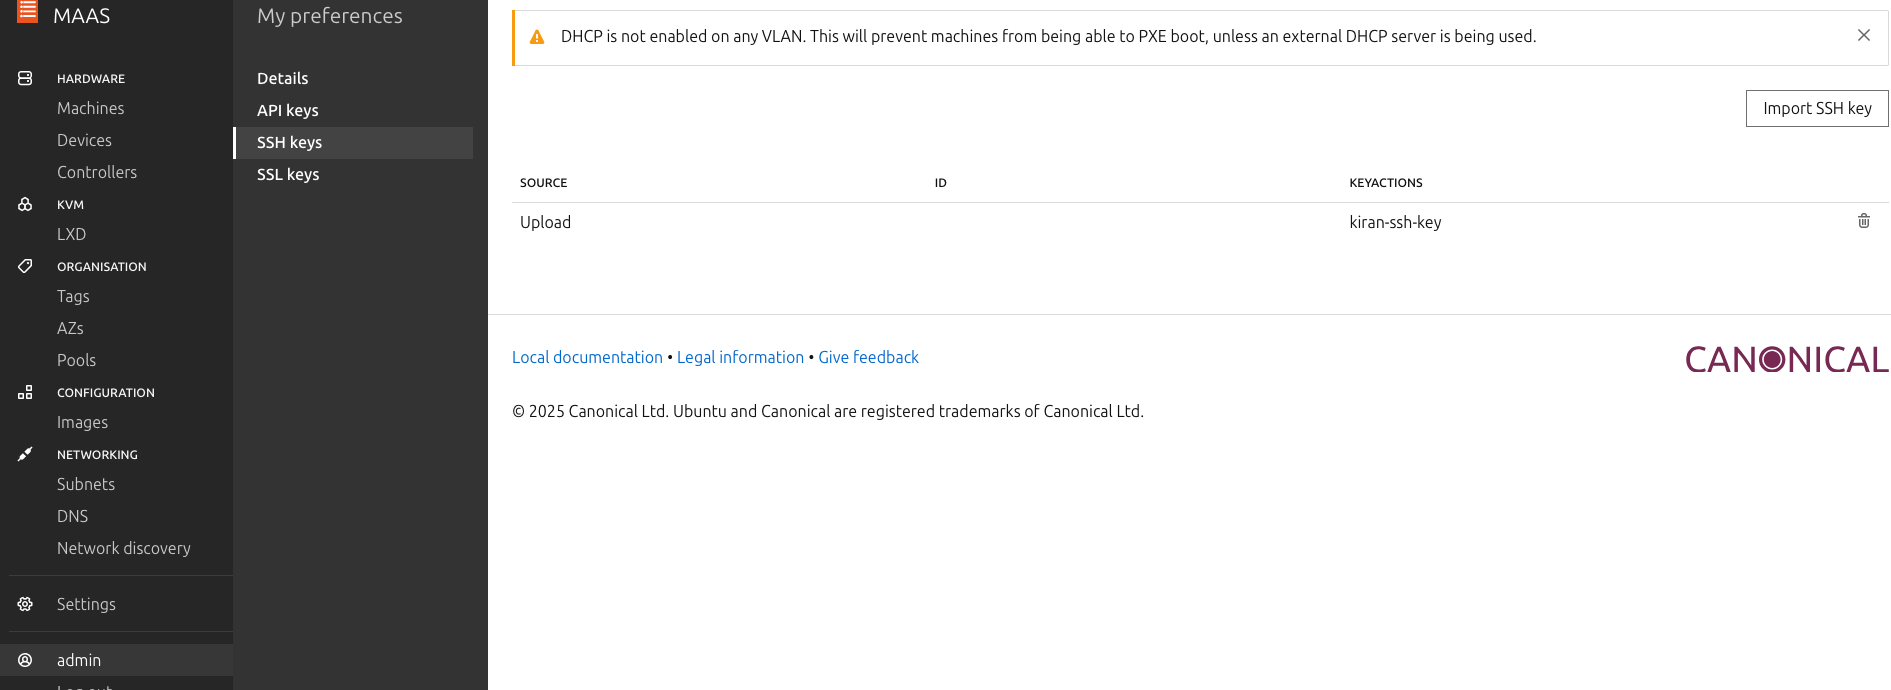
In MAAS
Navigate to Admin → SSH Keys → Import.
Paste the public key from the CloudStack-generated SSH key pair.
Save the changes.
After these steps, any baremetal node deployed via the MAAS Extension can be accessed using the private key from CloudStack.